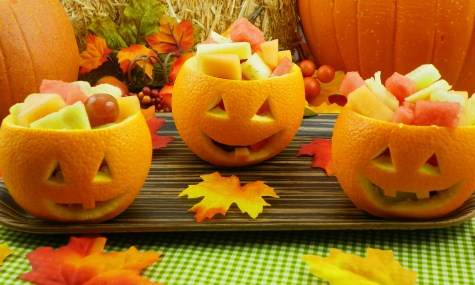

You'll Love This Jack-O-Lantern Fruit Salad Recipe
Fruit salad is a wonderful dish. It's yummy, packed with nutrition, and can be either a breakfast or a side dish for dinner. Some people even enjoy a fruit salad for lunch. This particular fruit salad recipe is specifically tailored for Halloween!
It takes a little more effort to make than a typical fruit salad, but the end product will absolutely be worth it. The Jack-O-Lanterns that will house this fruit salad are nothing short of adorable, and they're biodegradable! Throw them in your compost pile after you're done with them, and you won't have to worry about storing more Halloween dishes somewhere in your house.
The fruit that you put in each Jack-O-Lantern is up to you. You can go with traditional fruit salad options, like cantaloupe and kiwi, or change it up with your family's favorite choices. Regardless of what you pick, make sure you pick an assortment! A fruit salad isn't a fruit salad if it only contains grapes.
Serve these Jack-O-Lantern fruit salads to your kids on the morning of Halloween to help get them in the spirit. Or, if you can't manage to find time to do this in the morning, serve them alongside their dinner before they embark on their trick-or-treating excursion. These can also make for a beautiful appetizer for a Halloween party.
Jack-O-Lantern Fruit Salad

Ingredients:
Assorted fruit, such as melon, strawberries, apples and kiwis
Oranges (1 per person)
Mint leaves
Directions:
1. Chop the assorted fruits and mix them in a large bowl. You will need about ½ cup per orange.
2. To carve a pumpkin cup, slice off the top of the orange, using a knife to loosen the edges, scoop out the inside of the orange with a spoon. Toss the juice in with the fruit.
3. Carve a small jack-o-lantern face in each orange.
4. Fill each orange with fruit and replace it's top.
5. As a finishing touch, garnish each top with mint leaves for stems.