Butterflies can be quite difficult to draw. They have pretty colorful wings attached to a tiny body. Then these little wonderful insects have thin legs that look like twigs joined to a small sausage. In this guide, we will look at 8 steps to drawing a butterfly and a flower for it to perch on.
I created it in Photoshop and drew it with my Huion HS611 graphics tablet; however, all the steps work great on paper too.
Let's take a look at what tools you will need.
| Supplies | Reason for Preference |
|---|---|
| Drawing paper of your choice | If you're using watercolor pencils, heavier-weight paper is ideal. You can use either watercolor paper or, my favorite, a smooth Bristol. |
| Drawing pencils | Amazon has a great selection, but take a look at the dollar store near you. You might be surprised. |
| Colored pencils | Blending stumps and pencils allows you to be precise. |
| Erasers | Make sure you have both a moldable putty-type eraser and a standard rubber eraser. |
| Blending stumps or pencil | Blending stumps and pencils allow you to be precise. |
| White gel pen | Use this to add highlights to your drawing. |
1. Create a Foundation
With any drawing, the layout is important. First, begin with the body line, then draw a circle about 2/3 of the way up, an oval below it, and a small circle at the top.
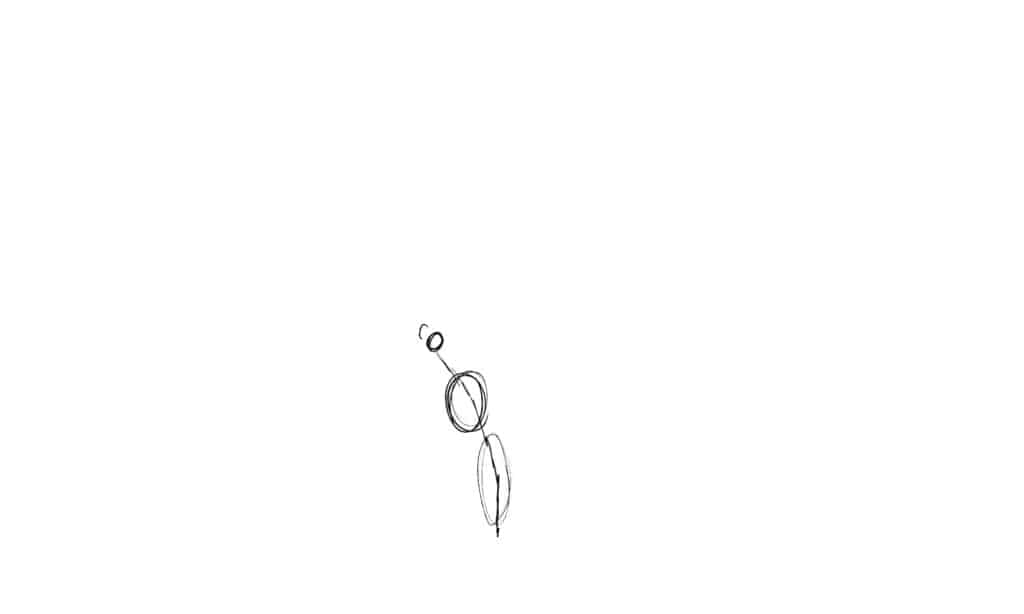
Sketch a body shape around the circles. Be sure to press lightly, as most of this will be blended or erased. Drawing something that you are going to erase may seem odd; however, think of it as a bookmark. Instead, these basic circles and lines help as guidelines for the object you are creating.
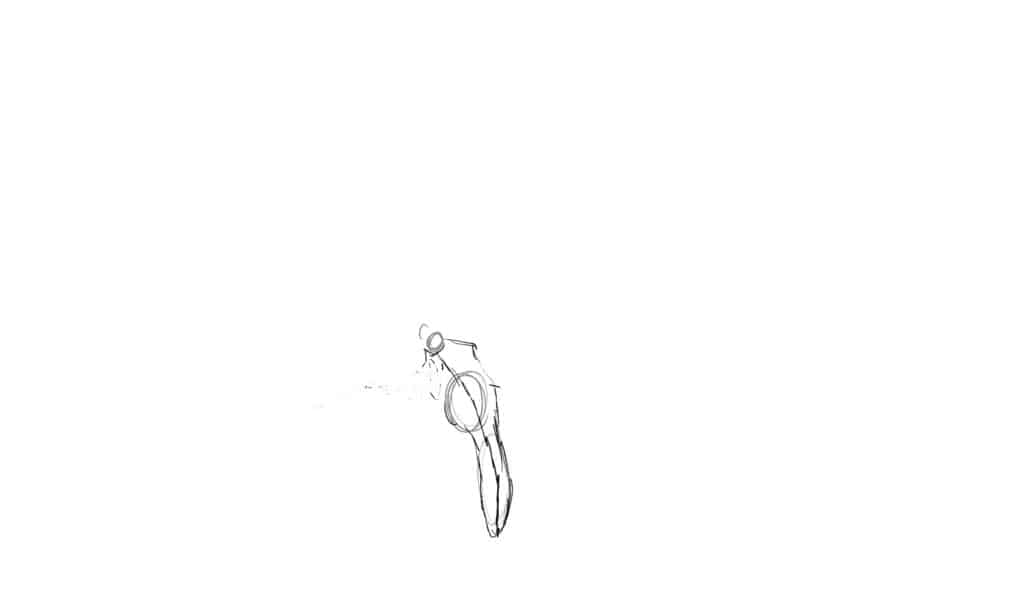
2. Make a Rough Draft

Next, lightly draw a body around the shapes you have made. Then add its tongue, antennae, and legs. Now that you have a rough idea, add the wings; these are usually triangle-shaped. Certain butterflies have lobes underneath the wings. If you like, add curved edges and round the corners.
3. Add Pattern Details
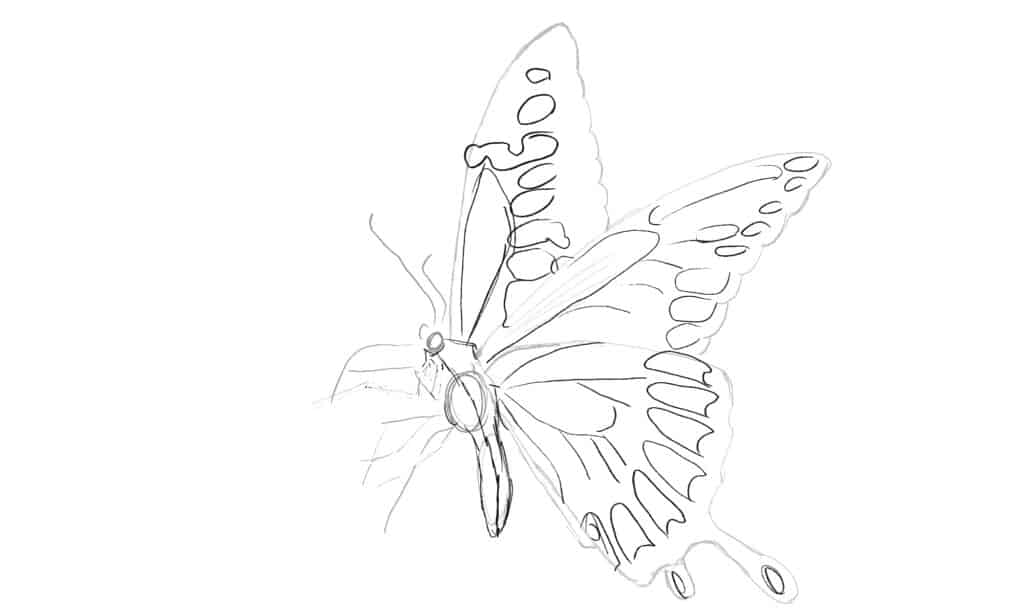
First, you will need to draft a pattern inside the wings to give you something to work with. You can always change the pattern later if you don’t like it. Remember, this is art. Make it your own.
Butterfly wings are really fascinating when they come out of their cocoon; they are soft and wrapped around themselves. Then, for approximately an hour, they flutter to pump fluids into their wings to unfold them. Once they are fully formed and flying, you are able to see the veins, and they will spend their lives circulating fluids through their bodies. Keep in mind that while drawing, you will be adding highlights and shadows to them later.

For a final touch to your sketch, add a flower. There are a few petals behind my butterfly; however, don’t outline them completely.
4. Clean Up the Outline

Now your butterfly is starting to look like something special. Erase all the small circles and the body line from the first step. Redraw the outline and rub out any messy lines. Leave just enough lines for you to add details and color. Then give your flower a stem.
5. Color Your Butterfly
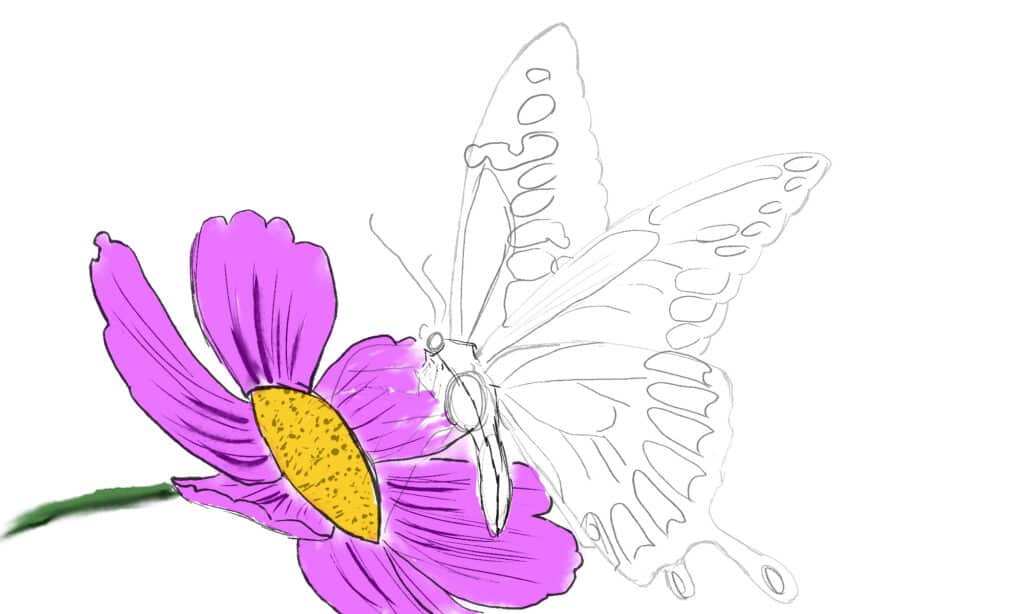
It’s best to start with the background first. I’ve tried to begin with the forefront first; however, it always seems to leave pencil or brushstroke behind. As a result, I always start with objects that are further away, then fill in the ones towards the front afterward. I like purple, so I decided to color the petals purple with a golden center. As you can see, the petals have small wrinkles that become deeper. For those, I used a darker purple.
- Digital artists: Of course, if you're working in Photoshop, that's not a problem. Just add another layer behind the butterfly for any background you would like to create.
- Paper artists: Color the background (flower) up to the very edge of the butterfly outline.

By coloring your butterfly next, it will be easier to get clean edges. I “smudged” specific areas because nothing in nature is perfect. The colors on the top of the wings are a little bit brighter than at the bottom.
- Digital artists: You'll need several different layers. For the flower, create four — one for each color. The butterfly only needs two.
Here's the layer order; from top to bottom, they're numbered:
- Butterfly — yellow
- Butterfly — black
- Flower center's spots — brown
- Flower center's color — yellow/gold
- Flower petals — purple
- Flower stem — green
- Paper artists: First begin with the yellow, then add the black around the edges. On the lower right wing, I blurred some of the yellow markings into the black area around them. It's probably easier to spot yellow and black together, then use a clean blending stump to blend them gently. Practice on a small piece of paper first to get the look you want.
6. Adding a Few Shadows

Adding shadows opposite to where the light would hit helps create a sense of shape. The hardest part of drawing is thinking about where the light source is coming from.
Shading Your Flower
The flower stem won't take long. Add some darker green to the bottom edge and blend it up from the bottom to the top. Then, let it fade toward the top edge of the stem to give it a rounded shape.
Begin with the center of the flower. Use a darker shade of the color you used for the center. In my drawing, the light is coming from the top left, just above the flower petals. So, the shadows will be deeper on the opposite side. Curve the shadow around the crown of the center to give it a rounded look. Then softly blend the edges.
Now, move on to the flower petals and do the same thing. Use a darker shade of the petal's color and add it to the areas in shadow. Gently blend the shadows along the lines where the creases in the petals appear.
Shading Your Butterfly
The butterfly is a little trickier, but perhaps more delicate is a better phrase. For the body, use a darker shade of the same color. Start by adding a little bit of shading around the area where its legs attach; they are usually a little fuzzy. Imagine an arm of sorts wearing a fuzzy jacket; it's slightly rounded and has a real shape, even though it's tiny. Add shading to the area right behind its eye and under its “chin.” Then, do the same thing around the creases in its abdomen and along the edges. Blend those shadows.
Do any shadows on the wings last. These are flat with a few veins that stick out. On the lower edge of the veins, add shading and then blend softly.
The direction of shading is often just as important as the shading itself. It can make or break the visual appearance because even if you don't exactly know what's wrong, the brain knows something doesn’t seem right.
- Digital artists: Create a new layer for the shadows, and set it to multiply. If you want to separate the shadows for the butterfly and the flower, that's fine; just create an extra layer set to multiply.
- Paper artists: Begin at the top left and work toward the bottom right. If you're left-handed, then begin at the top right. It will help you not smudge anything you want to stay clean.
Once you are happy with your color and shading, take a damp paintbrush and wet the colors to make them brighter.
7. Add Highlights to Your Butterfly Drawing
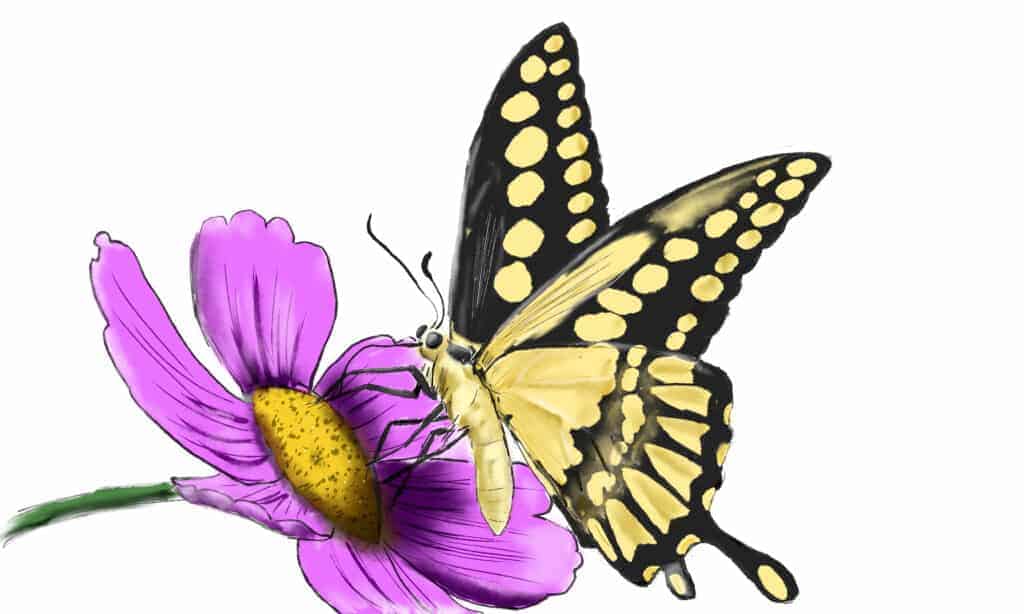
Isn’t it exciting you're almost done! Cleaning up the edges and adding highlights will make a drawing look a lot nicer. To complete your drawing, add selective highlights to the 8 steps to drawing a butterfly picture. Remember the light is coming from the top left corner.
Flower Highlights
If the light is coming from the upper left, you'll want to have a few highlights along a sliver of the petals' edges and in the creases of the petals next to the shadows you already placed. On the lower right area of the flower, add highlights to the outer one-quarter or so of the petal. Shape the highlights just as you would a shadow.
The center of the flower will have a small highlight too, but most flower centers don't reflect a lot of light. So make this subtle.
Remember to add a small bit of light along the top side of the stem!
Butterfly Highlights
Start with the eyes and legs. The eyes are round orbs, so you'll need to shape the highlights the same way you did in the shadows of the flower center. Add a little thin band of light along the top edges of the legs; then, soften the edges a little bit.
Now for the wings. Place a little highlight along the left edges of the wings and the upper side of its veins. As with the others, soften the edges of the highlights, but don't blend it in completely.
- Digital artists: In a new layer, use white in the areas that need highlights. Leave it at normal, and soften the edges a little.
- Paper Artists: On the off chance you're not using watercolor pencils, you can use a moldable eraser to lift graphite or colored pencil off the page. If you're using watercolor pencils, use a white gel pen and dot the highlights in, smudging them gently before it dries.
This last step is pretty easy but also vital.
Put your butterfly drawing down. Really! Leave it aside for a day or two, then come back to it. You may see a few things to add or adjust, or you may realize that it's stunning just the way it is.
One of the hardest things to do as an artist is to stop adding and adjusting things. It's also vital. I hope you had fun learning these 8 steps to drawing a butterfly.